Showing posts with label Birthday. Show all posts

Monday, 6 September 2021

Using up the little bits - You are Amazing

Do you ever find inspiration comes from the most random of places? This card literally came about when I was cleaning up from another card. I had trimmed lots of little strips of cardstock which I was sweeping into the bin when I thought to myself, gosh these little bits look like confetti.... ding, a card was born lol.

I just love how this card looks and the fact it turned out how I imagined is even better because lets face it, that doesn't always happen!

The font on this sentiment is beautiful and I was a little sad when this stamp set retired. But you know, some stamps never leave you stash and this is one of them.

I'm certainly not one to keep scraps but this card just proves you can make something pretty out of anything!

Happy Crafting,
Chloe

Monday, 22 March 2021

Artisan March Showcase - Friends Are Like Seashells

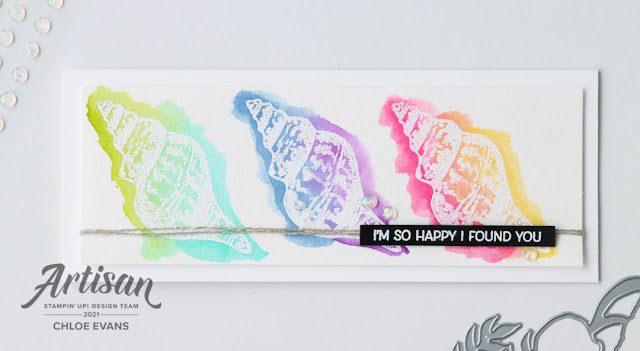
When I saw that my Artisan project for March was the Sand and Sea Suite I felt a slight moment of panic. This suite has not only been available for three months already, but it's also been super duper popular. I just kept wondering how do I make something original from a well loved bundle and so I decided to go in a completely different direction:
Now, I know rainbows aren't the first thing you think of when you look at the Sand and Sea suite but stick with me. The ocean is actually full of colours and rainbows from the corals, to the fish, to the reefs. So really, rainbows actually makes heaps of sense... to me anyway lol.
 
My first card was a simple, skinny card with white heat embossed stamped images, that I then added watercolour too. I kept this pretty straight forward and using my (limited) knowledge of the colour wheel, to choose which colours to pair together. I think by adding the black sentiment really makes the card pop too.
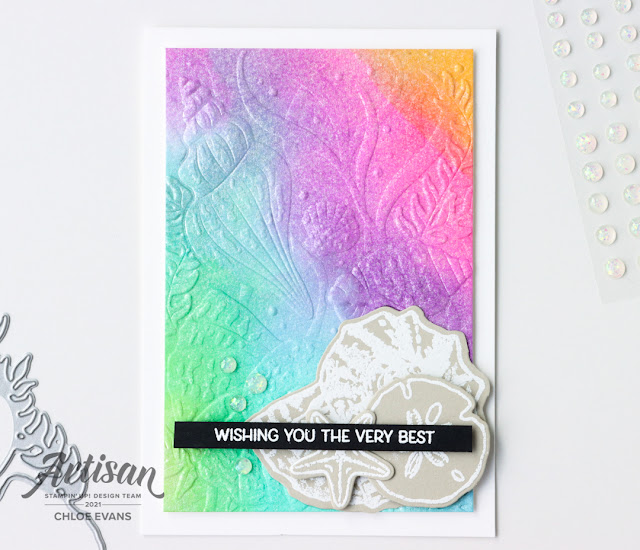
Now for this next card, I thought I would carry on with the rainbow theme, (as I had all the inks out on my desk anyway!) but this time I created a full colour watercoloured wash background. I did this by adding ink to a piece of window sheet and then misting the whole sheet with water. I also misted a piece of watercolour paper and then put the two pieces together. After a bit of squishing, the colours blended together to create this awesome background.
Once it was dry, I ran the watercolour paper through the Cut and Emboss machine using the Seashells embossing folder. I also added a spritz of Frost shimmer paint, which also helped the inks blend together.
 
And so for my last card, I decided I wanted to create a card that made the gorgeous Sand & Sea designer series paper shine. This design is an oldie but a goodie and is perfect to use up left over piece of pattern paper.
To make sure it tied in with the other two cards, I once again added a black sentiment and white embossed shells.

I hope you've enjoyed my creations this month and please make sure you pop over to the Stampin' Up! Facebook page so you can check out all of the other creations from this awesome team.

Happy Crafting,
Chlo

Sunday, 21 February 2021

Artisan February Showcase - Hydrangea Haven

 Welcome back guys for another fantastic Artisan Showcase. This month I got to play with the gorgeous Hydrangea Haven bundles and I really did have a whole heap of fun with this set.
As soon as I saw the stamps in the set I knew it would be perfect for the Baby Wipe Technique. This is something I haven't done in a very long times, but I knew the effect would be awesome for the flower head.
 
For those of you who don't know this technique, it's really pretty easy. I usually use a takeaway container but a plate with do fine too and you fold up 3 baby wipes and pop it in the container/plate. Next you add a few drops of ink in your chosen colours. I went with Gorgeous Grape, Highland Heather and Balmy Blue. Leave it a few minutes for the inks to spread and  blend together a little bit and then grab you stamp and use the baby wipes as an ink pad. So easy and gives such a fantastic look, plus each time you rei-nk your stamp, you get a different stamped look.
My second card is pretty easy and straight forward. I used white embossing powder for the images and the outline and then used my white craft ink to colour in the inside of the hydrangea. Super simple and pretty, which are totally my kind of card!

Thank you so much for popping in to day. AS always you can buy any of these products from my online store HERE.

Happy Crafting,
Chlo


Product List 
Whisper White Craft Stampin' Pad
[101731]

Friday, 29 January 2021

Artisan Post - Art Gallery Bundle

 I'm just going to start by saying that as soon as I saw the Art Gallery bundle in the Mini catalogue I knew I had to have it. In fact, it's only the second time I've purchased a whole suite. I needed all of it. The stamps are gorgeous and I love the sentiments in the set. The dies are so beautiful on their own and that designer series paper is ah-mazing. Add the window sheets which match the dSP and the gold leaf, you seriously can't go wrong. So it will come as no surprise that I decide to use that suite as my Artisan post for the Stampin' Up! Facebook.
 
So lets see what I created:
I just love how pretty and soft these two cards are. The first card really shows off the stamp set and coordinating dies. I couldn't help adding detail on the flowers using our Heat and Stick powder and then when it's warm and sticky, adding on the gold leaf.
Seriously the colour of the gold leaf is so clean and bright. I love using gold embossing powder but this gilded leaf is so much brighter.
 
I also used my stamping' Blends in coordinating colours too add some more detail to my flowers. I used the thick end of the marker and gentle swiped up and out from the middle of the flowers and leaves. So easy buy gives such a great effect.
My second card showcases some of the stunning Designer Series Paper found in this suite. One side is all large, painted flowers and blooms, while on the other side it looks like patterns and strokes from a paint brush.  
I couldn't help but using more of the Forever Gold Specialty Laser Cut paper. This is my second pack of these gold leaves and I just ordered my third. I love to add them to everything and anything!

If you would like to order any of the prodcts that I've used today, I have listed them all below and when you click on one of the images it will take you straight to my online store. Happy Shopping!

Take Care,
Chlo 

Product List