Monday 30 December 2013

Pals Paper Arts Challenge: PPA185

Another challenge card for you all today. This time the Challenge is over at the Pals Paper Arts Challenge Blog.

I usually miss the deadlines for these challenges, but this one closes later tonight, so just got it submitted in time!

So here is the sketch we were given:
 And this is the card I made:


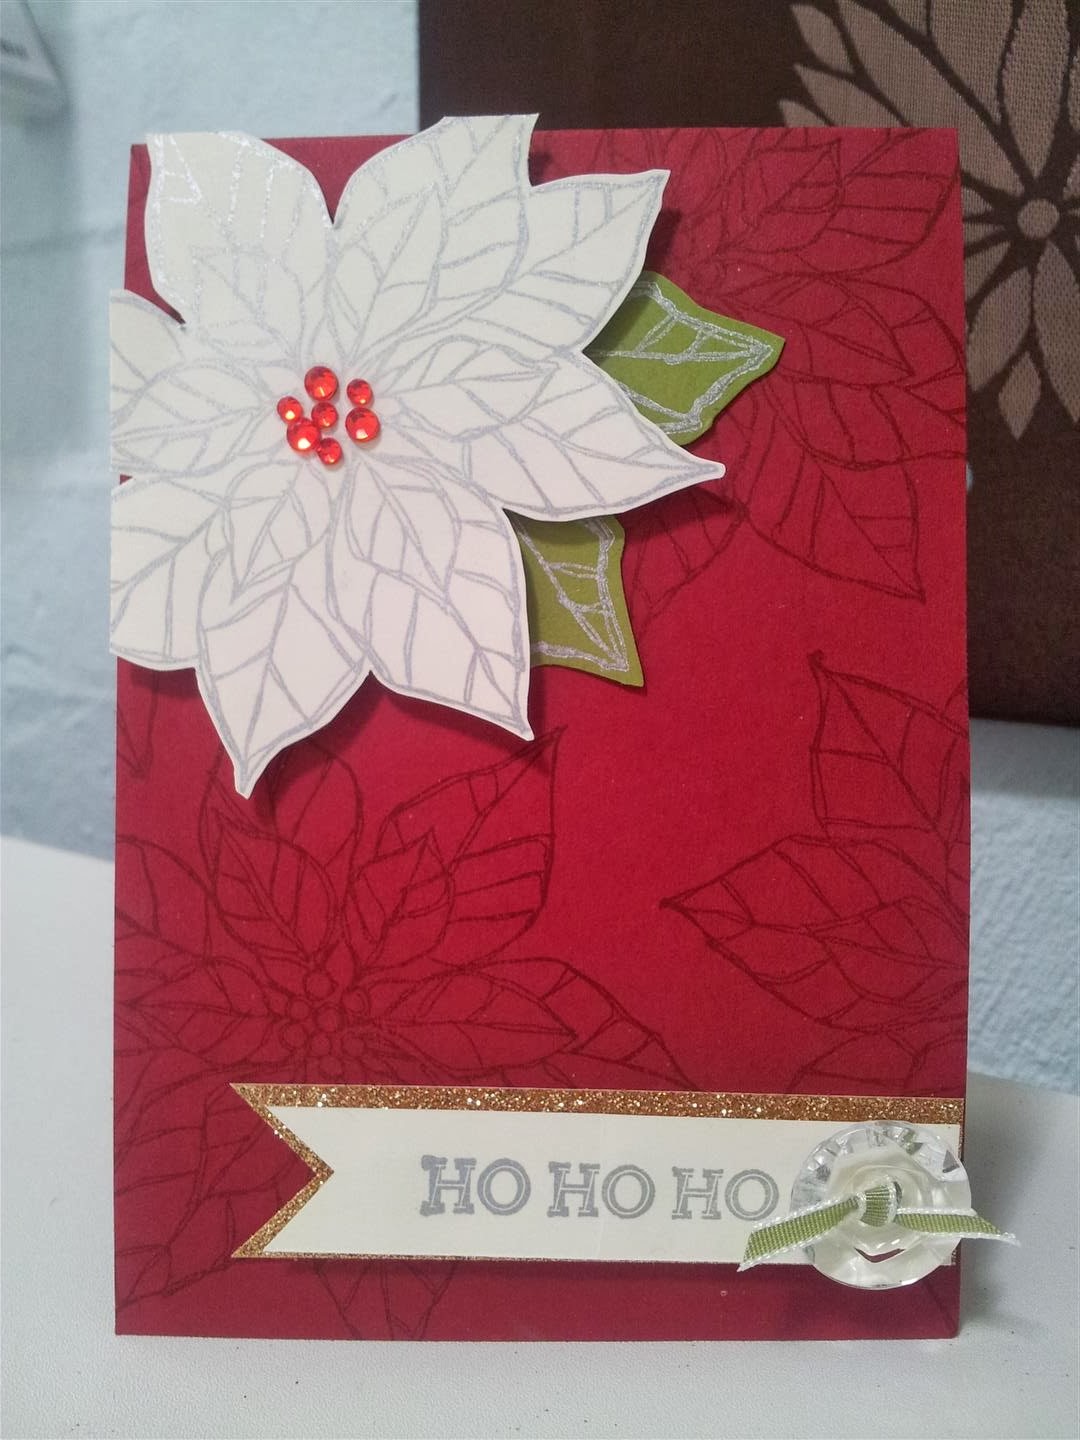
I've changed some of the shapes on the card, but other then that I've followed the sketch pretty closely. I have also used more SAB goodies!!

I'm just loving this beautiful DSP. I wanted to add a phrase to my card, but at the same time, I couldn't bare to cover any of the paper, so I thought some heat embossing on vellum would be a great compromise. The DSP is called Sweet Sorbet, and it could be yours for free during Sale-a-Bration. More details on SAB will be coming your way soon!!


The stamped phrase I've used also comes from a SAB set called "See Ya Later" and it has four really gorgeous sentiments in it. I'm telling you, I think this years Sale-a-Bration goodies are my favorite so far!!

You still have time to enter the challenge, so why not pop on over and take a look.

Have fun,
Chlo

Ingredients
Stamps: See Ya Later (SAB)
Ink: Sahara Sand and Versamark
Cardstock: Sahara Sand and Whisper White
DSP: Sweet Sorbet (SAB)
Other: Silver Ribbon, Vellum, Scallop Edge Punch, White Embossing Powder and Rhinestones

Sunday 29 December 2013

Let the Sneak Peeks begin and FMS117

Well I think my Mojo left with our Christmas Elf Sparkles, as I really haven't found the motivation to make anything this week. I have all this free time as Hubby is on holidays at the moment, so it gives me some child free time and I just can't face going into my scraproom.

Do you ever feel like that? Well I have three fail safe ways to get the juices flowing, the mojo moving and today I am going to share them with you!!

1) Clean up your scraproom. Yep I know it's not the best job, but I always find having everything put away, the tables cleaned down and the room ready to go, I always want to stay and start creating straight away. And hey if it doesn't work, no worries, you room is ready when you are!!

2) Make or buy something inspiring, pretty or beautiful for your craft room. This tip i think falls into the Retail Therapy section. I want my room to not only inspire me but also entice me in. Sometimes I will just sit and look at everything lol.

3) Ok this one is an oldie but a goodie. Pick a Challenge! Yep that's it. I know it sounds simple, but honestly it works. And this is the tip I used to inspire my card today.

I popped on over to Freshly Made Sketches and decided that the Sketch Challenge they had on today, would be perfect for me, easy and simple.
Honestly, how can you go wrong with that layout lol. So here is my take:


Pretty cute hey!! Ok so some of you will notice I am using one of the stamp sets in our new Valentine Promotion 'Love you More'. This set is so gorgeous and perfect for V'day. Oh and I can hear you asking about what is the DSP I've used... yep, well that is my SAB (Sale-A-Bration) sneak peek for today. It is one of the Free products you can earn during Sale-A-Bration. Honestly, it's even more gorgeous in real life!!

And did you notice I also add a bit of dimension to my little arrow by bending it in the middle slightly. Hopefully you can see it more clearly in this photo:


So there you go, I hope these helpful hints give your mojo a little nudge when you need it. And why not pop on over to Freshly Made Sketches and have ago yourself. The link is open until January 6th, so you have plenty of time!!

Have Fun,
Chlo


Ingredients

Stamps: Love you more,
Ink: Sahara Sand, Calypso Coral and Early Espresso
CS: Sahara Sand and Whisper White
DSP: Sweet Sorbet (SAB)

Friday 27 December 2013

Thank You Treat Boxes

Wow hasn't Christmas been and gone super quick!! It feels like you work up to it for months and then in a blink of an eye, it's gone. Unless you have kidlits at home and then it seems to go for days lol.

Being a Scrapbooker at heart, I always take millions of photos and Christmas seems to magnify my need of capturing every moment. So I thought I would show you just a couple of my favourite photos from our family Christmas celebration:


Such little cuties!! O.K so today I wanted to share these little treat boxes I made as "Thank You" gifts for my Class girls and the ladies from my Hostess group. They are so super easy to make and when one of my friends saw them, she asked if I could make another 25, so she could give them to HER customers lol.


These would be perfect for a Wedding, Baby Shower, Birthdays, gosh any celebration really. Oh and when I made mine, my local supermarket had Ferrero Rocher's on sale, Brilliant!!

I actually have a video tutorial for you from the gorgeous Christi over at Stampintx So you can make these cute little boxes yourself.

Have Fun,
Chlo

Ingredients

Stamps: Tiny Tags (R)
Ink: Melon Mambo
CS: Melon Mambo, Silver Glimmer and Whisper White
DSP: Sunshine and Sprinkles (R)
Other: Boho Blossom punch, Artisan Label punch, Jewellery Punch (R) and Daffodil Delight Stitched Grosgrain Ribbon

Thursday 14 November 2013

Inspiration comes from the Strangest of Places - Get Well Soon

Something a little different today. This card isn't a Christmas card and I haven't used my Envelope Punch Board. I know, it's a shock lol

This is actually one of the cards my ladies having been making at class this month. We decided that we would make three cards that you don't always use (thankfully). One is a Sympathy, one is for a Wedding and the other is the card I'm sharing today which is a Get Well card.

These cards are the ones that might sit in your card box for ages, but when you need it, you need it straight away.


Gorgeous isn't it. I just LOVE these colours together. The actual card design is a case from a card that I've had booked mark for quite a while now. It's by the very lovely Sandy Mathis and you can see her gorgeous card right HERE!!. Sandy actually used different stamps and different colours, but the design and theme are the same. Why change such a gorgeous original I say!!

But the inspiration for the colour combo comes from a completely different place. In fact, it came from the most boring chore in the world. Bringing in the washing. Yep, i was taking a pair of Miss N's undies off the line and they where these exact same colours. I thought, wow, what a great combination, I wonder if I could turn it into a card... Honestly it's amazing where the the inspiration finds us sometimes.

Have fun,
Chlo

Ingredients
Stamps: Flowering Flourishes, Papillon Potpourri and Delightful Dozen
Ink: Bermuda Bay, Perfect Plum, Early Espresso and Stazon Black
Cardstock: Bermuda Bay, Perfect Plum, Early Espresso and Whisper White
Other: Window Sheets, Elegant Butterfly Punch, Artisan Label Punch, Hexagon EF, Rhinestones and Sponge Daubers.

Wednesday 13 November 2013

Homemade Christmas Crackers or Bonbons.... depends on where you are!!

So today's post is another brilliant idea using the Envelope Punch Board, God I love that thing!! These Crackers were a CASE (Copy And Share Everything) from a pin I found on Pinterest. The clever crafter is Dianne from Art of Craft and you can find her original video tutorial HERE.


So over here in Australia we call these little guys Bonbons where in the UK, where I grow up, we called them Crackers. Either way, I always thought they where the best part of Christmas dinner. Oh and don't forget everyone has to wear the silly hat and laugh at the humorous joke!!

Well after making this little guy, I had it sitting on my desk when my very lovely Norwex Consultant popped by with my latest order. Now if you don't know what Norwex is, you really should pop over to Sheree's page and check it out. Best Micro fibre cloths ever. Honestly makes cleaning a breeze... Anyway, she saw the cracker and asked if I would be able to make her a dozen for her Norwex Christmas party?

So a few hours after she had gone, this is what I came up with. These are the red and green ones:


And these are the Blue ones:


They really didn't take long to make at all, especially with the help of the Envelope Punch Board. It really is such a versatile little thing. I also managed to use up lots of my retired paper and ribbon as well which is always handy. Means I've made room for new goodies lol.

Now if there is anything that you see that you would like to buy, please pop on over to my store. You can find the Shop Now button in the top left hand corner!!

Have Fun,
Chlo

Ingredients

Stamps: Oh Goodie
Ink: Island Indigo, Cherry Cobbler and Old Olive
Cardstock: Very Vanilla Whisper White, Champagne and Silver Glimmer
DSP: Holly Jolly (R), Be Merry (R) and Winter Frost
Other: Old Olive Taffeta, In-colour Ruffled (R), SAB Ribbon (R) and Circle Thinlits (For the banner shape)

Monday 11 November 2013

Have a Merry Little Christmas

Today's Christmas card kind of just, well, happened lol. I was playing around with the new stamp set Merry Little Christmas and then I found this piece of Hexagon embossed Cherry Cobbler CS and well here it is...


I had some of the Tulle left over from last years catty and thought I'd put that on too. Even though it's a bit thrown together, I actually really love this card. Funny how that works sometimes. Oh and who doesn't love a bit of glitter at Christmas? I have gone through so much Glimmer Paper, but lucky for me it's such good value!!

Have Fun,
Chlo

Ingredients
Ink: Cherry Cobbler,
Stamps: Merry Little Christmas
Cardstock: Old Olive, Cherry Cobbler and Whisper White
Other: Hexagon Embossing Folder, Chalk Talk Framelits, Tulle (R), Champagne Glimmer paper, Old Olive Taffeta Ribbon and Rhinestones

Sunday 10 November 2013

Not just for Envelopes - Notecard Gift Box

I have been having a little play with my Envelope Punch Board over the last few days and wow there is so much more you can use it for. In fact, today's share is what I'm going to use as my Teachers Gifts this year.


Isn't it cute. The box holds four little 4"x4" cards, plus four little envelopes to match (made on the punch board of course!!)

I have seen heaps of tutorials on how to make these cute little note card boxes but I think my favourite has to be THIS ONE by Kelly Gettelfinger at Always Stampin'.

I can't believe how easy they are to make and such a gorgeous gift for anyone. These ones are what I made to share with my Downline at our recent Friday Share Team Night. The girls loved them and I think we'll all be making a lot of these over the next coming weeks!!

The envelope punch board is available now and I think it's a steal at only $31.95.


Here is a close up picture of the box and the belly band I made to go around it. You could also keep it closed with a magnet or a Velcro dot, but I love making belly bands it's kind of like the icing on the cake!!

Have Fun,
Chlo

 Ingredients
Ink: Gumball Green, Daffodil Delight, Calypso Coral, Pool Party and Crumb Cake
Cardstock: Gumball Green, Daffodil Delight, Calypso Coral, Pool Party, Whisper White and Crumb Cake
Stamps: Workshop Words Too and Chalk talk
DSP: Epic Day
Other: Envelope Punch Board, Bakers Twine and Chalk Talk Framelits.

Saturday 9 November 2013

Envelope Punch Board


OH. MY. GOODNESS... I complete forgot to tell you about this AMAZING new tool that Stampin' Up! have just released. It's called the Envelope Punch board and it's AWESOME!!!


This amazing little tool, can make 66, yep that's the right number, not a typo. 66 different size envelopes and the best bit is it's so easy, fast and simple to do.


I don't know if your like me, but when it comes to our gorgeous DSP I can sometimes be a bit of a hoarder. Yes, ok I'm a HUGE hoarder lol. I have so much retired paper that I never know what to do with it.... UNTIL now that is!!!


Our DSP is perfect for making gorgeous, matching envelopes to put our beautifully created cards in. And with all the instructions, measurements, score tool and even it's own punch, all fitted on this little baby, you can score as you go!!


Oh and guess what and this is the clincher.... It doesn't just make envelopes!!! I know, exciting stuff right. But that's enough for now. More on what else this little baby can do another time.

Have fun,
Chlo


Thursday 7 November 2013

Christmas is coming...

So I was told that we have 7 weeks until Christmas... Wow, is it me or has this year really flown by. In fact just these last few months seem to have disappeared without a trace. Well I say without a trace but I guess I've been so busy with all my Christmas Classes, that I haven't really had much time to notice how quickly the big day is approaching.

Anyway, I thought it was about time that I started actually sharing with all of you, some of the Christmas cards my lovely girls have been getting to make.

So to kick it all off, I am going to share TWO cards with you. Well it's one design but two colour options.


I have got to say, these two are probably one of my favorite designs out of all the cards I have been making and I love it in both colours. I have used the absolutely gorgeous stamp set called Joyful Christmas and the Poinsettia stamp is stunning. Here in Australia, we find it hard to send Christmas cards that are snowy in theme, so this set is perfect for us, as all our Poinsettia are flowering this time of the year.

Here is a close up of the Cherry Cobbler one:


Anyone who knows me, knows I'm really not a huge fan of red and green. Though I really love how this card came out. I have also used the very shiny, Silver Encore ink which you can find in our Seasonal Catty. Did I mention it comes in gold too!!!


I always thought of Island Indigo to be a beachy, summer colour, until I saw it used in our new Winter Frost DSP (LOVE that paper too!!) But I have just fallen in love with it this Christmas and you will see it pop up again and again over the next few weeks. Oh and do you notice our new silver ribbon. It's so shiny and bright in real life. So gotta get me more of that!!!

Have Fun,
Chlo

Ingredients

Ink: Island Indigo, Cherry Cobbler and Silver Encore
Cardstock: Cherry Cobbler, Old Olive, Island Indigo, Always Artichoke, Whisper White, Silver and Champagne Glimmer
Stamps: Joyful Christmas and Oh, Goodie.
Other: Faceted Buttons, Rhinestones, Old Olive Taffeta and Silver Ribbon

Wednesday 6 November 2013

Best of...


Beginning of the month again, which means a new 'Best of' stamp set and this time it Best of Sale-a-Bration!!


I really like this set and I'm surprised how many of them I remember for Sale-a-Brations over the years!!

All this talk of Sale-a-Bration is getting me excited for our next one, which I can reveal will be 28th Jan - 31st March '14. So start booking those workshops now!!

Have Fun,
Chlo


Wednesday 23 October 2013

Christmas Extra Fold Thinlit Card

Yep you read that right. My Thinlit card for you today is a gorgeous Christmas card, with an extended fold!! So lots of space to decorate, plus room to write a beautiful message to you loved one!!

So a super quick post with lots of photo, just what I love :-)


First photo is the front of the card, and I'm using the lovely Joyful Christmas Stamp set today. I have also used lots of the little framelits that come in the Thinlit pack.

This next picture is the first fold...


Followed by the secret, extra panel!!


And here is it, all folded back up again, ready to be popped in the mail for Christmas. I might not have mentioned that once this cards are folded up, they still fit in a normal size envelop. how cool is that!!!


Well that's all today, please pop back tomorrow, for yet another Thinlits card and remember you can buy the Thinlits and any of the '25 stamps for 25% off'' at my shop. Just click on the Shop now button, in the top right hand corner of the screen!!!

Have Fun,
Chlo

Ingredients

Ink: Cherry Cobbler and Gumball Green
Cardstock: Cherry Cobbler, Very Vanilla and Champagne Glimmer
Stamps: Joyful Christmas and Oh, Goodie.
Other: Thinlits and Rhinestones

Tuesday 22 October 2013

25% off 25 Stamp Sets - Happy 25th Birthday Stampin' Up!


Woo hoo, I love a good sale ESPECIALLY when it's a Stampin' Up! Stamp Sale!!! To celebrate turning 25 this week (on the 25th can you believe!!) Stampin' Up! have chosen 25 awesome stamps to sell at 25% off.

Honestly most of the stamps on this list I already own and LOVE and yep you guessed it, I'll certainly be taking advantage to get the others!!

Below is the list of the 25 stamps available, but if like me, you are more of a Visual person, then click on THIS link and it will take you to my online store where you can see the full list with pictures!!


Oh and while your in the store, why not pick up some of those awesome, new Thinlit cards at the same time!!

Have Fun,
Chlo

The Thinlits are finally here!!


I know them as Flip Flop cards, you may know them as swing cards, but whatever the name, they were always so fiddle and hard to make.... Until NOW that is!!!


To say I'm slightly addicted to this amazing card making die would be an understatement. I stayed up until past midnight the other night just to have one more little play with them before bed!!

Over this next week, I have a few different cards to share with you and there are some really cool things you can make with this wonderful new product, so lets start with my very first card, which I have to say, is soooo cute!!


Now, I have had this little Hootabelle pinned for a while, as I have a gorgeous little girl turning two in a few days and she loves Owls, especially Hootabelle from ABC's Giggle and Hoot. The original idea came from the lovely, super talented and fellow Australian Demo, Jennifer Frost, over at Handmade by Jennifer Frost. Her cards are so gorgeous, that I could resist casing her "Hoot".


And when you open the card, the middle "flips" to reveal the other side... Clever or what!!!


But wait, there;s more. When you buy the Thinlits, they came with a heap of little framelits to add extra embellishments to any card or scrap page, not just for the Thinlits!!

The flyer below shows the two different Thinlits, Circle or Frame and what extra pieces you get with each one. As you can see on this card I have used the banner, label, xoxo, Scallop circle and the big heart.

Each set costs $55.95AUD plus P&H. I have only had them for a few days, but I just love the WOW factor you get each time you make a new card. At this rate I'll become a hoarder and won't want to give any of them away!!


If you would like to order yourself a set of these awesome Thinlits, then just click on the Shop Now button, on the top right hand side. Oh and did I mention they work brilliantly with our new Magnetic Platform!!!

Now, the only problem is trying to choose which set to buy... Easy, just buy BOTH!!!

Have Fun,
Chlo

Ingredients

Ink: Silver Encore
Cardstock: Pink Pirouette, Perfect Plumb, Whisper White, Tempting Turquoise, Crumb Cake and Pumpkin Pie.
Stamps: Memorable Moments and Fabulous Phrases.
Other: Thinlits Circle Die, Owl Punch, Small Heart Punch and Circle Framelits.

Sunday 29 September 2013

Nipper of the Year

I can't believe that Summer is just around the corner and that means a new season of Nipper starts any day now. My eldest loved her first nipper season and can't wait for the Sundays at the beach to start again.

Now I have to admit that I have been very slack with my scrapping lately and even though DD was picked Nipper of the Year for her age group last year and I had taken heaps of photos of her with her awards, I still hadn't scrapped them... until now that is!!

After we made a Sunburst card for class, I decided that it would make the perfect layout for a day at the beach, or in my case, a life as a Nipper.


I really love how using Daffodil Delight and Pumpkin Pie together with some sponging has given this layout a brilliant sun ray effect.


I also used the Gorgeous Grunge Stamp set to add some texture to the Crumb Cake cardstock, to resemble sand. Pretty clever I thought! Oh and did you notice the orange chevron washi tape? That's from the new Holiday Catalogue, part of the Halloween washi pack.

Anyway, this layout has been such a hit, my Scrapbooking class next month will be making one for themselves!!

Have fun,
Chlo

Ingredients

Ink: Crumb Cake, Pumpkin Pie and Daffodil Delight
Cardstock: Crumb Cake, Night of Navy, Pumpkin Pie and Daffodil Delight
Stamps: Gorgeous Grunge
Other: Halloween Washi Tape and Blue Glitter CS.

Tuesday 24 September 2013

There's just something about goldfish...

Anyone who knows me, knows I just love Goldfish. No idea what it is, but I just think they are so funny. When I was growing up, I had a tank full of Goldfish all called Bob!! I know, very original but easy to remember. My favourite ones were the really ugly ones with the big, puffy, swollen looking eyes. Just loved those poor little bug-eyed fish...

Anyway, what has this got to do with my latest card???? Well when I first got the our new Stampin' Up! catalogue I just fell in love with the single stamp 'Fishin' Around'. And then when I saw the suggested idea of filling a treat cup with water... well I was Hooked!!!


Isn't it such a clever little trick!! I've added some Champagne Glitter in the bottom of mine to look like sand, but beads would be great too... or even real sand!!!

The trick to sealing the water in the treat cup is to use a very good glue gun. You need a quick, constant stream of hot glue all around the age of the treat cup so the window sheet sticks to all of it. And that's really it. This card was so much fun to make and had a real WOW factor too. Just not sure how posting it will go ;-)

Have Fun,
Chlo


Ingredients

Ink: Smoky Slate and Black Stazon
Cardstock: Pool Party and Whisper White
Stamps: Yippee Skippy and Fishin' Around
Other: Epic Day DSP, Markers, Treat Cup, Window Sheet, Champagne Glass Glitter, Dot Embossing Folder, Scallop Border Punch, Pool Party Bakers Twine and Rhinestones

Thursday 19 September 2013

Best of Christmas and Christmas Single stamp.

Morning guys, Today I'm bringing to you two new Stampin' Up! promotions and both are Christmas Themed... Yippee!!

I'm a little late this month with sharing our new Best of... stamps for September. I had assumed that we would be getting Best of Halloween like our American friends, but nope, we got something even better. Best of Christmas!!!


These are perfect stamps if you are just starting out, or just want to freshen up you existing Christmas stamps. But wait there's more...


These are our new Single Stamps and they too are for Christmas. I also love the fact that they co-ordinate perfectly with our Chalk Talk and Deco Label Framelits.

So if you want to get started on those Christmas Cards or gift tags, email me an order or click on the Shop Button which can be found in the top right hand corner!!

Have Fun,
Chlo

Wednesday 18 September 2013

Subway Art MDS style

I have been playing around with MDS (My Digital Studio) a lot over the last few days after I saw a fellow Stampin' Up! demo, Marsha Hulland, make a gorgeous Birth Announcement poster using subway art and MDS.

Now I know my kids are too old for a birth announcement poster, but i thought wouldn't it be nice to do the same sort of idea but using words that describe them now. So after downloading 100's of free fonts and I means 100's I finally got started putting one together for my DD who is 6yr.

It took e a while to find all my new, exciting fonts but once I got started the actual putting together took next to no time at all. I made it 8" x 10" so that I could print it at my local photo place, (Big W) and it will also be super easy to find a frame for it.

I have to admit the hardest part was choosing the colours lol. But I can change them up as I go. It's so easy and such a great present. We are currently in the middle of decorating the kids rooms since we moved in so I thought I would make one for the boys too and give it to them for Christmas.

And did I mention that you can try our MDS for free!! Yep, you can download a 30 day free trial of My Digital Studio, just by clicking on my SHOP button and then going to My Digital Studio. Also every Tuesday, the MDS team release new downloads for you to buy.

So why not download the free trial today and give it ago. You'll be surprised at not only what you can make, but how easy it is to make it!!!

Have Fun,
Chlo


Saturday 7 September 2013

Not Melon Mambo

I honestly don't hate any of our gorgeous Stampin' up colours. I mean they are all such beautiful shades, but there are a few which aren't my favourite, go to colours. Melon Mambo has to be one of them, I'm afraid.

So when I was a bit stuck for what cards to make for my upcoming class, my lovely friend and fellow Downline, Brenda, offered to set me a colour challenge. She said, "Out of all these colours, which one do you dislike the most?" I should have known what was coming when I said, "Ummm, would have to be Melon Mambo" Well guess what colour I was given to use...

So I had to make a card using Melon Mambo and Pink Pirouette (which is my favourite pink I think) and I could only choose one other colour, which had to be Early Espresso. I have to admit that I really enjoyed the challenge (thanks Brenda xx ) and I do actually love the card I made.


I love how the "A thousand thanks" phrase is inked up once and then stamped repeatedly up the card until we reach the top, with the colour just getting lighter and lighter.

And how cute are those little butterflies floating around the flowers. I love the Butterfly Embosslits, so quick and easy to make, just a matter of popping it in Mr Big and then done!!

Have Fun,
Chlo

Ingredient

Ink: Melon Mambo and Pink Pirouette
Cardstock: Early Espresso, Melon Mambo, Pink Pirouette and Whisper White
Stamps: Lots of Thank, Everything Eleanor and Too Kind
Other: Butterfly Embosslits and Rhinestones