Monday, 6 September 2021

Using up the little bits - You are Amazing

Do you ever find inspiration comes from the most random of places? This card literally came about when I was cleaning up from another card. I had trimmed lots of little strips of cardstock which I was sweeping into the bin when I thought to myself, gosh these little bits look like confetti.... ding, a card was born lol.

I just love how this card looks and the fact it turned out how I imagined is even better because lets face it, that doesn't always happen!

The font on this sentiment is beautiful and I was a little sad when this stamp set retired. But you know, some stamps never leave you stash and this is one of them.

I'm certainly not one to keep scraps but this card just proves you can make something pretty out of anything!

Happy Crafting,
Chloe

Saturday, 4 September 2021

Just Add Ink #570 - Hats Off

 Ok so I know with lockdown, it's tricky to keep track of the days, but seriously how did Fathers day sneak up on us? And also, while I'm thinking about it, September!!

So while I found a present at the petrol station (he loves chocolate so it's all good!) I realised I was going to need to make a card for the kids. Now I could get them to make the card, but I've only just cleaned up my craft room and didn't feel like letting those hooligans in there.

Also, I saw the perfect colour challenge happening over at Just Add Ink and so I decided to run with that.

Coastal Cabana is my all time favourite SU colour (alongside Crumb Cake obviously) so I knew this challenge would be perfect.

 
So, I finally got to play with the Hat's Off bundle which is awesome. Great set for boys, young and old and perfect for my fathers day card.

It's a it tricky to see, but the blueish strip on top of the lack strip is actually a piece of rushed silver cardstock, which is in the holiday catalogue. It's shinier in real life but hard to capture in a photo. I find it hard to create mens cards without all the sparkly so using some foil cardstock is a good alternative.

Right, time to get this card written up and wrap the chocolate. At least I didn't eat it before he gets it this year.

Happy Crafting, 
Chlo

Friday, 3 September 2021

Artisan Showcase for August -

Happy Spring people and I for one am absolutely ready for warmer days, time spent with the family at the beach or enjoying lazy days around the pool.

Lockdown has certainly been challenging and homeschooling has been... fun lol, but it has given me more craft time then usual which has came in handy for my Artisan projects. And that brings me to today's post which is this months card, created using the Evergreen Elegance bundle.


I felt like doing a bit of blending and then I wanted to make a shaker and so obviously I couldn't choose, which meant I had to make a card with both.

I absolutely love the Subtle Shimmer Sequins and they are perfect for a shaker card. While our blending brushes make creating a beautiful blending background easy peasy.

The second card is a little more simple but still stunning. I used the coordinating punch, to punch out heaps of the trees in white and then adhered them to the white cardbase. It makes such a pretty, subtle background which I just love.

And now I better get back to homeschooling these three crazy kids. Is it time for a gin!!

Happy Crafting,
Chlo

Saturday, 17 July 2021

Artisan Showcase for July - Sweet Symmetry Suite

Gosh I seriously can't believe I'm now past half way with my time on the Stampin' Up! Artisan Design team. It's been such a fantastic ride and I have seriously enjoyed every minute of it.
 
But today I get to share my cards using the Sweet Symmetry Suite, which to be honest, I hadn't given a second glance in the catty, but it's now become on of my absolute favorite suites.
 
Photopolymer stamps are just crying out to be used in this way, creating repetitive patterns in different colours. I got my colour idea from the gorgeous coordinating designer series paper, which I then went on to use to create matching envelopes for these cute cards.

The second card was a little trickier to make as I had to keep moving and lining up with my previous stamped image. Now if you had a stamp position tool, this would be so much easier, cut I went a little old school and just created a noughts and crosses board with faint pencil lines and used that to guide where to stamp my next image. Once the inks dry, you can then just gentle rub out your pencil lines
I really do think this suite is a real winner and I know once you've checked out what the other artisans have created with it, you'll be adding this to your next order!

Happy Crafting,
Chlo

Saturday, 3 July 2021

Artisan Designer Series Paper Showcase - You're a Peach

 To celebrate our beautiful designer series paper special, the Artisans were asked to create something fantastic with different designer series paper to show how amazing our papers are.

I was luck enough to be asked to use the You're a Peach paper and I knew instantly I wanted to create a home decor piece, or something I could actually pop up in my craft room.

So, I decided to go back in time, dig out my hot glue gun and create what felt like a million rosettes!!


 I have to admit I was thrilled with my handmade wreath once the sore fingers from all the hot glue had got better!!  I can't rememer thelast time I made rosettes, as I think I used them on Christmas gift tags one year and created over 100 of them. It really did put me off!


 I wanted to create a little tanner in the middle and out small alphabet dies where perfect for this. I then used our double banner punch to create the little flags. Another must have in the craft room.

And that's how I created this pretty little piece of art and all I have to do now, is wait for my husband to finally put a nail in the wall so I can hang it up!

Happy Crafting,
Chlo


Saturday, 26 June 2021

Artisan Post - Rainbow Snowflake Wishes

I was super late to the Snowflake Wishes bundle that came out in last years Christmas Catalogue, but I decided at the last minute I would buy it because 1) I loved seeing what everyone had made with it and 2) I thought if I had it a whole year early I would be able to get a head start on my Christmas cards... but here we are pretty much 6 months out from the big day and I've finally inked up the stamps!


So I felt I had to create something a little left of field as snowflakes have been done to death and anyone who's followed my Insta page long enough will know that I just love rainbow order. So it seemed like a fun way to put a new spin on an old favourite.

This first card I just used our blending brushes to create a rainbow background. I then white heat embossed the snowflakes and then added a few die cut snowflakes too. I really love all the layering of the different white accents, which obviously make the coloured panel pop.

For my second card, I did a similar thing, but this time I created a watercoloured wash card panel and then used that to die cut my snowflakes from.

I added a few little stamped snowflakes in the matching colours and finished the whole card with some rainbow coloured bling!

I really do love this bundle and I was so glad to see that it carried over. I'm pretty sure it will be around, in my collection for sometime to come!!

Happy Crafting,
Chlo

Sunday, 20 June 2021

Artisan Showcase for June - Hand-Penned Suite

Welcome to another Artisan Showcase where this month I got to create with the beautiful Hand-Penned bundle.

I wanted to use colours that aren't necessarily in the coordinating designer series paper and I actually had a pile of scrap strips on my desk so I decided to use those and came up with this two gorgeous designs.


One of my favourite ways to emboss has always been clear heat embossing powder onto black cardstock. It always gives such a WOW to a card and when the stamp used has a fair it of detail, which this large flower stamp had, it really does give the card that expensive look.

So that's for me today, as always you can purchase any of the products I've used from my Stampin' Up! shop.

Happy Crafting,
Chloe

Wednesday, 9 June 2021

Artisan Showcase for May - Color and Contour

Welcome back to our latest Artisan Showcase. This month I was asked to design with some fun new stamps in our awesome new Stampin' Up! Annual catalogue.

The Color and Contour bundle has some great stamps and sentiment, but I really feel the dies in this set are the standout. We have the usual outline dies for the flowers in the stamp set but we also have a mixture of awesome scalloped rectangle does plus a super fun scalloped boarder die. Which is why I had to make those the stars of the show.

I love the new Hostess only Designer Series paper called Pattern Party. One side of the paper is coloured patterns while the other side is black and white. So super versatile!!

Make sure you pop over to the Stampin' Up! Facebook and check out what the other Artisans have created!!

Happy Crafting,
Chloe


Sunday, 2 May 2021

Artisan Showcase for April - Dandy Garden

 Welcome back to another fantastic showcase with the Artisan Team. This month I'm sharing some fun cards that I created using the Garden wishes bundle and the coordinating Dandy Garden Memories and More cards.
Now these cards are usually associated with memory keeping but as I'm actually a virtual scrapper, I decided to share a few ideas on how these can be used for cardmakers too.
 
This first card was actually made with the premade cards and envelopes pack. I cut the card front off the card base and used it as my focal point and added vellum just to mute the brightness of it. I even cut a strip of the front of the envelope liner to add as a decorative strip on my card. Using the Dandy Wishes die to add the pops of black in the shape of Dandelions.
My second card is using the Tailored Tag punch and I just punched a couple of piece from each of the cards I could find in the memories and more pack. I pieced them all together like a jigsaw and then added a sentiment that I had cut out of one of the cards. Super quick and easy card to make.
And lastly created this card using the few bits and pieces I had left over on my desk. I decided to use the stickers from the pack for my sentiment but I wanted to give them a little it of height. So I have this old trick, where I use my embossing buddy to add powder to the back of the sticker so it loses it's stick and then I can added foam mount to give it the height I wanted!
I really hope you've enjoyed the cards today and it will get you to think aout how you can use the Memory and More card kits in your cardmaking!

Happy Crafting,
Chloe

Monday, 22 March 2021

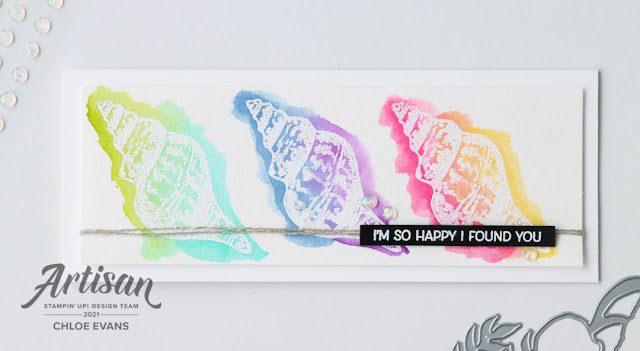
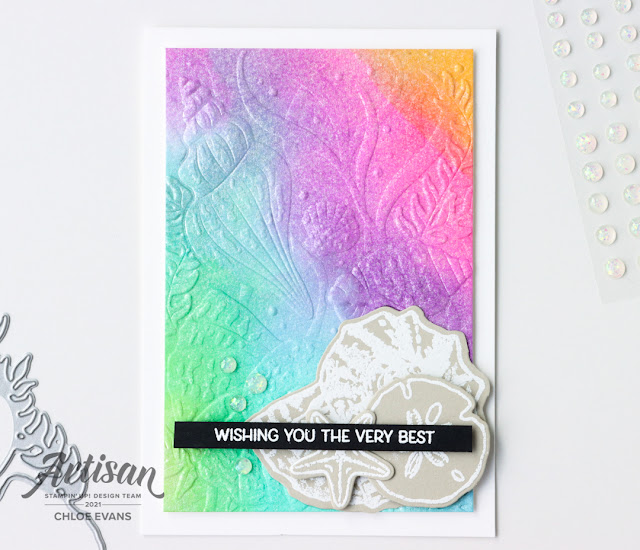
Artisan March Showcase - Friends Are Like Seashells

When I saw that my Artisan project for March was the Sand and Sea Suite I felt a slight moment of panic. This suite has not only been available for three months already, but it's also been super duper popular. I just kept wondering how do I make something original from a well loved bundle and so I decided to go in a completely different direction:
Now, I know rainbows aren't the first thing you think of when you look at the Sand and Sea suite but stick with me. The ocean is actually full of colours and rainbows from the corals, to the fish, to the reefs. So really, rainbows actually makes heaps of sense... to me anyway lol.
 
My first card was a simple, skinny card with white heat embossed stamped images, that I then added watercolour too. I kept this pretty straight forward and using my (limited) knowledge of the colour wheel, to choose which colours to pair together. I think by adding the black sentiment really makes the card pop too.
Now for this next card, I thought I would carry on with the rainbow theme, (as I had all the inks out on my desk anyway!) but this time I created a full colour watercoloured wash background. I did this by adding ink to a piece of window sheet and then misting the whole sheet with water. I also misted a piece of watercolour paper and then put the two pieces together. After a bit of squishing, the colours blended together to create this awesome background.
Once it was dry, I ran the watercolour paper through the Cut and Emboss machine using the Seashells embossing folder. I also added a spritz of Frost shimmer paint, which also helped the inks blend together.
 
And so for my last card, I decided I wanted to create a card that made the gorgeous Sand & Sea designer series paper shine. This design is an oldie but a goodie and is perfect to use up left over piece of pattern paper.
To make sure it tied in with the other two cards, I once again added a black sentiment and white embossed shells.

I hope you've enjoyed my creations this month and please make sure you pop over to the Stampin' Up! Facebook page so you can check out all of the other creations from this awesome team.

Happy Crafting,
Chlo

Monday, 22 February 2021

Sending a little Something - Butterfly Brilliance

This awesome Butterfly Brilliance bundle is coming to you all very soon, but as demonstrators we got to pre-order this set a little earlier. One of our many perks of joining up!

I had actually created this first card as part of a project for the Artisan team. Ar first I couldn't really decide on what to use first. I loved the big stamp, I loved the dies that cut all the little details, but what I really loved was the die that not only cuts of the big stamp, but also cuts of some of the butterflies on the coordinating Designer series paper. And so that's what I use to create the card.

The bottom of the card is stamped with the large stamp in Blushing Bride, which i did stamp off beforehand. I also added some splatters with the black Stampin' Write Marker.
 
The sentiment comes from another stamp set called Fancy Phases, which I heat embossed on to Blushing Bride cardstock and then cut into strips.
So when I was tidying up, I realised I had heaps of other butterflies left over on my desk (Did I mention the die cuts out all 6 from one sheet of pattern paper) and so I thought I had better CASE myself but change up the colours. So here are two more cards, same design but in different colours.
The Butterfly Bouquet suite is available to order from the 2nd March, so make sure you pop that date in your calendar!!

Happy Crafting,
Chlo

Sunday, 21 February 2021

Artisan February Showcase - Hydrangea Haven

 Welcome back guys for another fantastic Artisan Showcase. This month I got to play with the gorgeous Hydrangea Haven bundles and I really did have a whole heap of fun with this set.
As soon as I saw the stamps in the set I knew it would be perfect for the Baby Wipe Technique. This is something I haven't done in a very long times, but I knew the effect would be awesome for the flower head.
 
For those of you who don't know this technique, it's really pretty easy. I usually use a takeaway container but a plate with do fine too and you fold up 3 baby wipes and pop it in the container/plate. Next you add a few drops of ink in your chosen colours. I went with Gorgeous Grape, Highland Heather and Balmy Blue. Leave it a few minutes for the inks to spread and  blend together a little bit and then grab you stamp and use the baby wipes as an ink pad. So easy and gives such a fantastic look, plus each time you rei-nk your stamp, you get a different stamped look.
My second card is pretty easy and straight forward. I used white embossing powder for the images and the outline and then used my white craft ink to colour in the inside of the hydrangea. Super simple and pretty, which are totally my kind of card!

Thank you so much for popping in to day. AS always you can buy any of these products from my online store HERE.

Happy Crafting,
Chlo


Product List 
Whisper White Craft Stampin' Pad
[101731]

Sunday, 14 February 2021

Happy Valentines Day - Heartfelt

 Happy V' Day guys and gals. Hubby and I aren't really a big follower of Valentines Day. Well hubby isn't lol. He seems to think our Wedding Anniversary is our own personal Valentines Day which would be fine with me if he remembered that one too!!

Anyway, I love any occasion where I get to make a card and as I haven't used the awesome Heartfelt Bundle for a while... probably last Valentines Day now I come to think of it, I thought today was a good day to get all Lovey Dovey.

Now this card is CASE from the amazing Wendy Cranford, who creates some of the most amazing cards. I've been a big fan of hers for ages plus I had a bit of a fan girl moment when she sat next to us at a Mexican restaurant when I went to Orlando a few years ago. I seriously was so star struck I couldn't go up and talk to her... I regret is now, but who knows maybe I'll get another chance some day.

Anyway, Wendy had created this card last year (you can see that gorgeous creation HERE) and I knew it would be perfect for my hubby. I changed the colours up and added in a touch of gold foil plus some of those super cute Resin Heart embellishments from the Snail Mail suite. 
 
I paired this beautiful card with a box of Malteasers for Hubby. He was obviously surprised I had bothered and probably felt a little guilty too, which any wife knows isn't always a bad thing lol. 

I hope you guys are all sharing a little love in your life today, even if it's a little bit of Self Love, something we all need more of in our lives.
 
Happy Crafting,
Chlo

Product List